The simplest model of specular illumination is the Phong model. The distribution of microfacets is not determined by a real statistical distribution. Instead it is determined by... making things up.
The Phong model is not really based on anything real. It does not deal in microfacet distributions at all. What the Phong model is is something that looks decent enough and is cheap to compute. It approximates a statistical distribution of microfacets, but it is not really based on anything real.
The Phong model states that the light reflected in the direction of the viewer varies based on the angle between difference between the view direction and the direction of perfect reflection. Mathematically, the Phong model looks like this:

The Phong term is multiplied by the light intensity in the lighting equation.
The brightness of the specular highlight for a particular viewing direction is based on raising the cosine of the angle between the view direction and the reflection direction to a power. As previously stated, this model is not based on anything real. It simply creates a bright somewhat-circular area on the surface. This area gets dimmer as the viewer is farther from the direction of perfect reflection.
The s term in the equation represents the roughness of the surface.
A smooth surface, which should have a smaller highlight, has a large
s. Since the cosine of the angle is a number on [0, 1], taking it
to a power greater than 1.0 will make the number smaller. Therefore, a large
s exponent will make for a small highlight.
The specular exponent can range from (0, ∞). A small exponent makes for a rougher appearance, while a large exponent suggests a shiny surface.
The Phong term computed above is then multiplied with the light intensity. This represents the maximum light reflected along the view direction.
However, just as with diffuse lighting, surfaces can absorb some quantity of the light that would be specularly reflected. We could use the diffuse color here, multiplying it by the specular term. But this would not be physically correct for many kinds of objects.
Many surfaces, particularly certain man-made pigments and plastics, have multiple layers to them. The top layer will specularly reflect some portion of the light. However, it will also let some portion of that light reach lower layers. These layers have stronger diffuse reflectance. So the specular absorption on the surface has different characteristics than the diffuse absorption in the lower layers. Usually, the specular layer reflects equally on all wavelenths, so the specular highlight tends to be the color of the light itself.
Notably, metals do not do this. Their diffuse absorption tends to be the same as their specular absorption. So while blue plastic under white light has a white specular highlight, gold metal under white light has a gold highlight.
The Phong Lighting tutorial demonstrates the Phong specular model.
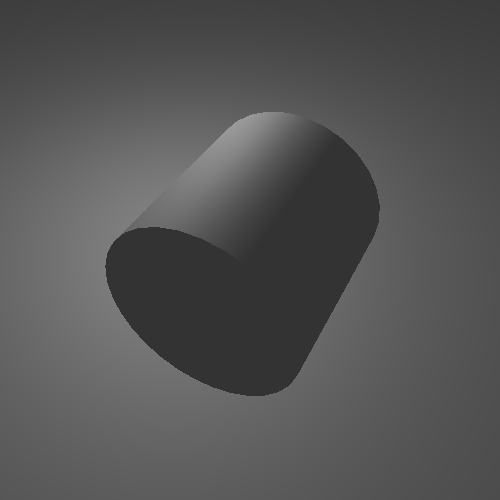
The tutorial is controlled similarly to previous lighting tutorials. Clicking and dragging with the right mouse button controls the orientation of the cylinder. Pressing the T key will swap between the scaled and unscaled cylinder. The Y key toggles the drawing of the light source. The B key will toggle the light's rotation on/off. Pressing the Space Bar toggles between drawing the uncolored cylinder and the colored one.
The light's position is mostly controlled as before, with the I,J, K, and L keys. The specular value is controlled by the U and O keys. They raise and low the specular exponent. Using Shift in combination with them will raise/lower the exponent by smaller amounts.
The G key toggles between a diffuse color of (1, 1, 1) and a darker diffuse color of (0.2, 0.2, 0.2). This is useful for seeing what the specular would look like on a darker surface color.
The H key selects between specular and diffuse, just specular and just diffuse. The ambient term is always used. Pressing Shift+H will toggle between diffuse only and diffuse+specular.
The rendering code is nothing you have not seen in earlier tutorials. It loads 6 programs, and uses the various controls to select which to use to render.
There are two vertex shaders in use. One that takes the position and normal attributes, and one that takes them plus a per-vertex color. Both of them output the camera-space vertex normal (computed with a normal matrix), the camera-space vertex position, and the diffuse color. In the case of the shader that does not take a per-vertex color, the diffuse color output is taken from a uniform set by the code.
The fragment shaders are more interesting. They do lighting in camera space, so there is no need for the reverse-transform trick we used previously. The shaders also use light attenuation, but it only varies with the inverse of the distance, rather than the inverse squared.
The main portion of the specular+diffuse fragment shader is as follows:
Example 11.1. Phong Lighting Shader
vec3 lightDir = vec3(0.0);
float atten = CalcAttenuation(cameraSpacePosition, lightDir);
vec4 attenIntensity = atten * lightIntensity;

vec3 surfaceNormal = normalize(vertexNormal);
float cosAngIncidence = dot(surfaceNormal, lightDir);
cosAngIncidence = clamp(cosAngIncidence, 0, 1);

vec3 viewDirection = normalize(-cameraSpacePosition);
vec3 reflectDir = reflect(-lightDir, surfaceNormal);
float phongTerm = dot(viewDirection, reflectDir);
phongTerm = clamp(phongTerm, 0, 1);
phongTerm = cosAngIncidence != 0.0 ? phongTerm : 0.0;
phongTerm = pow(phongTerm, shininessFactor);

outputColor = (diffuseColor * attenIntensity * cosAngIncidence) +
    (specularColor * attenIntensity * phongTerm) +
    (diffuseColor * ambientIntensity);
The initial section of code should be familiar. The Phong specular computations start with computing the direction to the camera. Since we are working in camera space, we know that the camera is at the origin (0, 0, 0). The direction from point A to point B is the normalization of B - A. Since the destination point is at the origin, that becomes simply -A, normalized.
The next line computes the direction of perfect reflection, given the light
direction and the surface normal. The function here, reflect,
is a standard GLSL function used for precisely this purpose. Notice that the
function in question requires the that the light direction is the direction
from the light. Our light direction is the direction to the
light. This is why it is negated.
This function is useful, but it is important to know how to compute the reflection direction on your own. Here is the formula:

The L vector is the direction to the light, so negating it produces the vector from the light.
From here, the Phong term is computed by taking the dot product of the reflection direction and the view direction, clamping it to 0, 1. The next line, where we use the angle of incidence, is very important. What this line does is prevent us from having a specular term when the surface normal is oriented away from the light. If this line were not here, it would be possible to have specular highlights appear to shine through a surface. Which is not particularly realistic.
The GLSL standard function pow is next used to raise the
Phong term to the power. This function seems generally useful, but it has a large
number of limitations. The pow function computes XY, where X is the first parameter and Y is the second.
This function only works for values of X that are greater than or equal to 0; it returns undefined values (ie: anything) otherwise. Clamping the Phong term ensures this. Also, if X is exactly 0.0, then Y must be strictly greater than zero; undefined values are returned otherwise. These limitations exist to make computing the power function much faster.
And for Phong specular computations, the limitations almost never come into play. The cosine of the angle is clamped, and the specular exponent is not allowed to be zero.
Notice that the specular term is added into the diffuse and ambient terms. This has meaning for the intensity issue we have seen before. If the diffuse and specular colors are too large, and the light attenuation is quite small, then the resulting values from the lighting equations can be larger than 1.0 in magnitude. Since OpenGL automatically clamps the colors to 1.0, this can cause unpleasant effects, where there appears to be a very bright, white area on a surface.
Having even a weak specular term can make a significant, if subtle, difference. In our case, the specular color of the material is a fairly weak (0.25, 0.25, 0.25). But even with a rough specular highlight, the surface looks more physically reasonable.
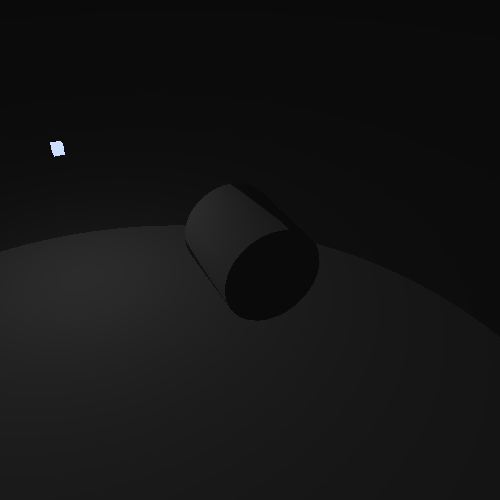
In particular, it is interesting to note what happens when you use a very dark diffuse color. You can activate this by pressing the G key.

If there was no specular term at all, you would see very little.. The specular highlight, even with the fairly weak specular reflection of 0.25, is strong enough to give some definition to the object when seen from various angles. This more accurately shows what a black plastic object might look like.
One thing you may notice is that, if you bring the light close to the surface, the specular area tends to have very sharp edges.

This is part of the nature of specular reflections. If the light is almost perpendicular to the surface, the specular reflection will shine brightest when the light is almost eclipsed by the surface. This creates a strong discontinuity at the point where the light is no longer in view.
You generally see this most with rough surfaces (small exponents). With smoother surfaces, this is rarely seen. But this is not the only visual oddity with Phong and having small exponents.
If you drop the exponent down to the minimum value the code will allow, you will see something like this:
This ring area shows one of the main limitations of the Phong model. When trying to depict a surface that is rough but still has specular highlights, the Phong model starts to break down. It will not allow any specular contribution from areas outside of a certain region.
This region comes from the angle between the reflection direction and the view direction. This area is the region where the reflection direction and view direction are more than 90 degrees apart.
Under the microfacet model, there is still some chance that some microfacets are oriented towards the camera, even if reflection direction is pointed sharply away. Thus, there should be at least some specular contribution from those areas. The Phong model cannot allow this, due to how it is computed.
What all this tells us is that Phong works best with larger exponents. Small exponents show its problems and limitations.